Showing posts with label n. Show all posts
Showing posts with label n. Show all posts
Sunday, 25 December 2016
Download Install Android N Developer Preview Images For Nexus 6P 5X 6 9
Download Install Android N Developer Preview Images For Nexus 6P 5X 6 9
Today, Google released a rather surprising statement, saying that it would be releasing the first Android N Preview Image for a few Nexus devices. Since Google hadn’t made any previous statements about Android N, this came as a shock for many tech enthusiasts. Well, a good kind of shock of course.

Google has released the first Android N Preview Images for the Nexus 6P, Nexus 6, Nexus 5X, Nexus 9, Nexus Player and Pixel C. Unfortunately, the Nexus 5 was left out from the party.
Google has released the first Android N Preview Images for the Nexus 6P, Nexus 6, Nexus 5X, Nexus 9, Nexus Player and Pixel C. Unfortunately, the Nexus 5 was left out from the party.
If you have any of the mentioned devices above, then you can download and install the Preview Image to get a taste of Android N.
How To Install Android N Preview Image
- Download Nexus 6P Android Preview Image
Download | angler-npc56p-preview-85ffc1b1.tgz - Download Nexus 6 Android Preview Image
Download | shamu-npc56p-preview-54b13c67.tgz - Download Nexus 5X Android Preview Image
Download | bullhead-npc56p-preview-6c877a3d.tgz - Download Nexus 9 Android Preview Image
Download | volantis-npc56p-preview-0e8ec8ef.tgz - Download Nexus Player Android Preview Image
Download | fugu-npc56r-preview-7027d5b6.tgz - Download Pixel C Android Preview Image
Download | ryu-npc56p-preview-335a86a4.tgz
Download the firmware on your computer. Then be sure that you have ADB drivers for your phone installed.
- Connect your phone to your computer via USB cable.
- Open ADB tool on your computer. Run this code to put your phone in fastboot mode
adb reboot bootloader
- Extract the Preview Image and double-click on flash-all. This will flash the Android N firmware, baseband, bootloader and all required files on your phone.
Now reboot your phone and you will be greeted by the new Android N boot animation.
Available link for download
Thursday, 22 December 2016
Android N Developer Preview 2 is now available Download factory images here
Android N Developer Preview 2 is now available Download factory images here
It look like it was just yesterday that the first Android N Developer Preview was released, but the Company has today begun seeding Developer Preview 2. We’re wildly installing the update on our Nexus devices and working on a full list of all the new features, but for now here are some quick download links…

As can be found over at the Android Developers site, the following direct links are factory images for build NPC91K.
- Nexus 5X
- Nexus 6
- Nexus 6P
- Nexus 9
- Nexus 9 LTE
- General Mobile 4G (Android One)
- Pixel C
- Nexus Player (Coming soon)
Google has also provided OTA images if you want to go that route instead. You can use these if your device already has Android Developer Preview 1 for a faster update. Simply follow our guide for installing Marshmallow OTAs if you need to learn how to do this.
- Nexus 5X
- Nexus 6
- Nexus 6P
- Nexus 9
- Nexus 9 LTE
- General Mobile 4G (Android One)
- Pixel C
- Nexus Player (Coming soon)
Available link for download
Saturday, 17 December 2016
Android N update schedule for Samsung Galaxy Device
Android N update schedule for Samsung Galaxy Device
Samsung took more time than expected to release the Android 6.0 Marshmallow update to its flagship devices. The company started rolling out the firmware in January this year, months after its counterparts had taken the leap, and most of the flagship devices received it just a few weeks ago. However, it is said to be planning to push out Googles latest operating system Android N to some of its flagship devices this year.
 Google unveiled Android N at its annual developer conference event I/O 2016. The beta version of the firmware is currently available for download but actual release of the OS is expected to happen after a couple of months.
The Android N update schedule for its devices, however, SamMobile has reported, citing insiders, that devices like the Galaxy S6, Galaxy S6 edge, Galaxy S6 edge+, Galaxy S7, Galaxy S7 edge, and Galaxy Note 5 will be the first to get the new firmware, and it is expected to happen in the fourth quarter of this year. It went on to claim that the OS should come to the Galaxy Tab S2 sometime next year.
The public beta of the firmware is currently available to Google Nexus phones via OTA (over-the-air), but it is just for testing. It comes with features like multi-window, direct reply notifications, Google Assistant, Clear All, Improved file browser, VR interface, bundled notifications, Data saver, Extra power efficiency and improved Java 8 language support.
Available link for download
Sunday, 27 November 2016
How to Update Nexus 5X Nexus 6P Nexus 6 and Nexus 9 to Android N Developer Preview 3 Factory Image
How to Update Nexus 5X Nexus 6P Nexus 6 and Nexus 9 to Android N Developer Preview 3 Factory Image
Android N Developer Preview Beta is now available for the Nexus 5X, Nexus 6P, Nexus 6, and Nexus 9 phones and tablets. The latest Android N Developer Preview Beta NPD35K is the next upcoming major firmware release by Google. It brings some new features like multi-window mode, an enhanced doze mode, a revamped Settings screen and a quick toggle in the notifications panel. Other changes include improved notifications, improved multitasking and app switching, dark mode etc.

Don’t worry we are going to share step by step guide to safely Update your Nexus 5X, Nexus 6P, Nexus 6, and Nexus 9 to Android N NPD35K Developer Preview 3 Factory Image.
Don’t worry we are going to share step by step guide to safely Update your Nexus 5X, Nexus 6P, Nexus 6, and Nexus 9 to Android N NPD35K Developer Preview 3 Factory Image.
Prerequisites:
- This tutorial is only for Huawei Nexus 6P and we are not sure if it will work on the other variants of the Nexus 6P on other carriers.
- Your phone can be on any previous Android version or even on a custom ROM. It doesn’t matter at all. This tutorial will still work for installing Android N Developer Preview Beta.
Disclaimer: We provide various Firmware Updates and Rooting process along with Custom ROM, Modes, file are all belong to their owners/developers. The autor of this site or the developers are not responsible, if you damage or brick your device.Do it on your own risk and follow the instruction properly.
How to Update Huawei Nexus Device to Android N NPD35K Developer Preview 3 Factory Image
Step 1 – Download Android N Factory Image on your PC, if you haven’t already.
- Download Android N Factory Image for Nexus 6P
- Download Android N Factory Image for Nexus 5X
- Download Android N Factory Image for Nexus 6
Step 2 – Connect your Nexus Device to your computer using the USB cable.
Step 3 – Please make sure Fastboot is configured and properly installed on your computer.
Step 4 – Turn OFF your phone.
Step 5 – Get into the Fastboot/Bootloader Mode on your phone. Turn ON the phone while pressing and holding the Volume Up + Volume Down + Power buttons till you see the Fastboot menu and START on top.
Step 6 – Now extract the downloaded file anywhere in your computer. Go to the folder angler-NPD35K and then copy/paste all the files to your Fastboot directory.
Note: If you followed our tutorial on setting up Fastboot on your computer, there is a 99% chance your Fastboot directory will be the platform-tools folder in your Android SDK directory.
Step 7 – From the factory image files in your Fastboot directory, do the following depending which OS you are on:
- On Windows: Run the file “flash-all.bat”.
- On Mac: Run the file “flash-all.sh” using Terminal.
- On Linux: Run the file “flash-all.sh”.
Step 8 – That’s pretty much that you had to do for flashing the stock factory image on your Nexus. Now wait and watch as the process is completed — or follow the on-screen instructions on your phone if in case you have to unlock the bootloader.
Step 9 – After the installation completes, the phone will boot now and it might take about 5 minutes to boot on your first time. So, please wait with patience!
That’s it! Your Nexus device should now have the official Android N NPD35K Developer Preview Beta software update installed on your phone using the stock factory image from Google! Go to Settings >About phone to verify.
Available link for download
Saturday, 26 November 2016
10 Secrets Of Window 7 Tips n Tricks You Didnt Know!!
10 Secrets Of Window 7 Tips n Tricks You Didnt Know!!
Window 7 become a most popular OS because of its simpleness and user friendly. although you are using this OS but there are many things or secrets which you dont know. I have tried to show some important and useful tips of window 7, hope you enjoy it.

1: Change the background of windows media player:
Go to Run and type “Regedit”, It will open a registry editor.
Locate this key in registry editor
HKEY_CURRENT_USERSoftwareMicrosoftMediaPlayerPreferences
Double click on the key LibraryBackgroundImage and enter a value between 0 to 6 (each number represents a background).
Done!
2: Move open windows:
If we press windows logo key + arrow key, then we will see the hover window is moving in the different sides according to the pressed arrow key.
We can also minimize our opened hover window by pressing windows logo key + two times down arrow key.
Done!!
3:Windows 7 trick to access hidden themes:
Windows 7 doesn’t come bundled with a huge set of themes with it, so here is a simple windows 7 trick by which we can use windows 7 themes which aren’t made for us.
Just type C:WindowsGlobalizationMCT in the search box of start button and press enter.
You will see some folders of themes which are made for other countries like USA and Canada.
Done!!
4:Install windows 7 on netbook with a pendrive or flash drive:
To install windows 7 on a net book with a pen drive, Take a 4GB pen drive and format it with FAT32 file system, Then just copy an ISO image to the pendrive by xcopy d: e: /d /e (where d: is the DVD drive which contains windows cd in it and e: is the pen drive location). It will create a bootable pen drive by which you can easily install windows 7 on netbook.
5:Zoom in and Zoom out in an easy way:
Windows 7 made accessing of magnifier lot more easier than its predecessor, to zoom in press windows key and + and to zoom out press windows key and -
Done!!
6: New windows 7 calculator:
New windows 7 calculator looks like vista one, but if you look it closely then you will find a lot of advance modes like standard, scientific, programmer and statistics.
These modes support thousands of operations to solve a complex problem. To activate any of the mode just click on view and select mode.
Done!!
7:Experience the new windows 7 WordPad:
The all new windows 7 WordPad supports format like .docx and .odt, so now you don’t need to download Microsoft office 2007, in order to open a MS office 2007 word document.
Done!!
8:Burn Cd and Dvd’s with windows 7 built in burner:
Now you can burn with widow 7 burner easily.
Windows 7 provides its own burner to burn cd’s and Dvd’s, So we don’t need to download softwares like nero to burn ISO.
To burn an ISO file, Right click on the ISO file and select Burn Disc image, or easier just double click the ISO file.
Done!!
9:Change the order of taskbar options:
Many windows users worry for their taskbar, so if you are one of them, Here is a great news.
You can easily arrange the taskbar options in any order by dragging and dropping.
10:Make a system repair disc:
Almost all versions of windows supports this handy feature, making system repair disc is helpful in situations when we are facing problems booting windows.
System repair disc restore the windows to an old state without affecting your hard disk data. To create a system repair disc go to start, then maintenance and then create a system repair disc.
Available link for download
Tuesday, 22 November 2016
Android N developer preview 2 released Here’s what’s new Complete list
Android N developer preview 2 released Here’s what’s new Complete list
Google just released its second preview of Android N for the developer community. Here’s everything offered in the latest release:

- The Android N developer preview 2 includes a new API for 3D rendering called Vulcan, which should offer better performance at a higher efficiency. The update also includes new Launcher shortcuts to quickly perform various actions within a specific app.
- Google is also changing its emoji design for what it calls a more “human-like” look. Developers working on messaging and keyboard apps can start updating their emoji now.
- The update offers a few improvements to multi-window support, which is a major new feature for Android N. There are some bug fixes as well that should make for a smoother experience overall.
Android N is still only meant for developers, but if you have a Nexus 6, Nexus 5X, Nexus 6P, Nexus 9, a Pixel C or the General Mobile 4G from the Android One series you can try it out for yourself through the Android Beta Program.
Complete list of all the changes in Developer Preview 2
Launcher Shortcuts: One of the more obvious user facing features in DP2 is the ability for apps to add shortcuts to the launcher. Examples include: sending a message to your best friend, navigating home in a mapping app, or playing the next episode of a TV show in a media app.
Emoji Unicode 9 support: Following Android 6.0.1‘s new emoji, Dev Preview 2 adds support for Unicode 9 which replaces the current generic people for more human-looking ones. The update also introduces support for skin tone variations and Unicode 9 glyphs, like bacon, selfie and face palm.

Vulkan : Dev Preview 2 adds support for the Vulkan 3D rendering API [Not all devices will support Vulkan, with more details available in the developer documents.]
New Folders: Homescreen folders have received a slight redesign. While still circular, the folder icon on the homescreen now shows the first four apps. The window effect into the folder is convenient, but could use some polish as the corners of app icons get cut. When there are only three apps in a folder, the third one gets centered.

Calculator Shortcut in Notification Shade: There is now a shortcut to the Calculator app in the notification shade.

Clear All in Multitasking: There is now a ‘Clear All’ button in multitasking. Users have to swipe all the way to the top of the card stack in order to see it.

New Setup Screen: During the initial setup process, a new screen lists shortcuts to set up a mail account, ‘Ok Google’ hotword detection, and control lock screen notifications, etc. Tapping on them will open the corresponding setup screen in the Settings app. However, the screen does not appear to be fully flushed out as pressing ‘Additional apps’ does nothing.
Available link for download
Tuesday, 8 November 2016
FREE SEAT Ramadhan buffet at Pick n Brew
FREE SEAT Ramadhan buffet at Pick n Brew
Hi All,
I would like to share my experienced during breaking fasting on the 3rd ramadhan. I was being selected for free buffet at Pick n Brew glenmarie Shah Alam. The free buffet offer for is very limited. There are few seat available for you all to grab. This free seat available throughout Ramadhan. What you have to do is to call them and book for free seat. if you lucky enough, you will be called for free seat (maximum of 4 peoples). I like Pick n Brew because of the coffee. They serve all sort of coffee. Their coffee comes from kenya, africa and southeast asian like indonesia. Enough with the coffee. I like to share here is the food that being served on that day. The food was fantastic. from meet, chicken, grill fish, fillet fish, pasta, ulam and many more. I believe that there are more 25 to 40 dishes being serve. The only things doesnt have on that day was dish based on prawn/shrimp. Part from that, everything else was good. The waiter and waitress was very welcoming and the environment was very nice. I really enjoy it. No doubt it is a good bargain even if i have to pay for RM38+ per person. Anyway, I just wanna share my experienced and hope this will be one of your destination for buffet this ramadhan.

Anyway, check this link to get more info on how you can get free seat for buffet at Pick n Brew
Available link for download
Friday, 4 November 2016
Expected Motorola Devices to Get Android N 7 0
Expected Motorola Devices to Get Android N 7 0
Google released Android N first preview edition, the developer preview of the upcoming version of Android operating system. Shocked to see another form of Android so soon? No doubt, us as well. Google’s beginning ahead of schedule with this “work-in-progress” rendition (as they call it) in the trusts of getting input from developers that they can work into the final release.

As almost all Motorola devices runs the pure Android firmware and always get any Android Updates after Nexus and Android One Smartphones . Motorola Moto Phones will sure get Android N 7.0 update , but the question is which Motorola Smartphones will get it first or which one probably not? Here we have a list of Expected Motorola Devices to Get Android N 7.0 First.
Expected Motorola Devices to Get Android N 7.0 First
- 2015 Moto X Pure Edition (3rd gen) 2015
- Moto X Style (3rd gen) 2015
- Moto X Style (3rd gen) 2015
- Moto G (3rd gen)
- Moto G 2nd gen with 4G LTE
- Moto X Force
- DROID Turbo 2
- DROID Maxx 2 2015
- Moto G Turbo Edition (3rd Gen)
These are the devices from the Motorola bag which are highly expected to get the upcoming Android 7.0 N, according to their specifications and release dates .
Available link for download
Sunday, 23 October 2016
Get Android N Emojis For Any Rooted Android Device
Get Android N Emojis For Any Rooted Android Device
Google introduced many new features and functionalities with the Android N Developer preview. For the first time ever, the Android OS holds more emojis than the iOS or any other operating system. Unfortunately, not all Android devices run on the Android N and not all the smartphones will be able to see or use the emojis from the latest Unicode. However, developers have extracted the Unicode module and can be flashed onto any rooted devices that enable us to see and use the Android N emojis.

Use Android N Emojis ? EmojiPedia
Warning: Please back up your font in /system/fonts/NotoColorEmoji.ttf prior to flashing. Also, take a Nandroid backup before you proceed. Reader’s discretion is advised.
2. Make sure you have latest device drivers setup on your PC in order to transfer the files to your device’s internal storage. Get it from the official page of your device manufacturer.
Step 2: Transfer all the necessary files to you device’s internal storage or SDcard. Place the files where you can easily locate it.
Step 3: Now boot into TWRP recovery. To do so, turn off your device completely and then press and hold the power button and volume down key for a few seconds. Once you see the TWRP logo that means you have successfully booted into the recovery. Alternatively, if you have rooted device, then use Android apps like the Quick boot or Boot Smart.
Step 4: Once into TWRP, take a Nandroid backup. To do so, tap Backup option and select all the partitions including the system, data, boot, recovery, EFS and cache (optional).
Step 5: Now return to the home screen again and tap Install option. Navigate to the Emoji package file on your internal storage and select it.
Step 6: Now swipe right on the confirmation action button below to install the Emoji package.
Step 7: Once installation completes, you can wipe the Dalvik cache or simply choose reboot to systemoption.
That’s it. Once you reboot, you can now start seeing new Android N emojis.
Download Android N Emojis
Flashable Android N Emojis ? Download [Mirror] | File: Android_N_Emojis.zip
Use Android N Emojis ? EmojiPedia
Warning: Please back up your font in /system/fonts/NotoColorEmoji.ttf prior to flashing. Also, take a Nandroid backup before you proceed. Reader’s discretion is advised.
How to Install Android N Emojis For Any Rooted Android Device?
Prerequisites
1. Make sure you have a custom recovery installed on your device.
2. Make sure you have latest device drivers setup on your PC in order to transfer the files to your device’s internal storage. Get it from the official page of your device manufacturer.
Installation Instructions:
Step 1: Download the Emoji package from above.
Step 2: Transfer all the necessary files to you device’s internal storage or SDcard. Place the files where you can easily locate it.
Step 3: Now boot into TWRP recovery. To do so, turn off your device completely and then press and hold the power button and volume down key for a few seconds. Once you see the TWRP logo that means you have successfully booted into the recovery. Alternatively, if you have rooted device, then use Android apps like the Quick boot or Boot Smart.
Step 4: Once into TWRP, take a Nandroid backup. To do so, tap Backup option and select all the partitions including the system, data, boot, recovery, EFS and cache (optional).
Step 5: Now return to the home screen again and tap Install option. Navigate to the Emoji package file on your internal storage and select it.
Step 6: Now swipe right on the confirmation action button below to install the Emoji package.
Step 7: Once installation completes, you can wipe the Dalvik cache or simply choose reboot to systemoption.
Available link for download
Friday, 21 October 2016
How to Root Huawei Nexus 6P on Android N Developer Preview 3
How to Root Huawei Nexus 6P on Android N Developer Preview 3
Android N Developer Preview Beta is now available for the Nexus 5X, Nexus 6P, Nexus 6, and Nexus 9 phones and tablets. The latest Android N Developer Preview Beta NPD35K is the next upcoming major firmware release by Google. It brings some new features like multi-window mode, an enhanced doze mode, a revamped Settings screen and a quick toggle in the notifications panel. Other changes include improved notifications, improved multitasking and app switching, dark mode etc...

Meanwhile, you can Root your Nexus 6P on latest Android N Developer Preview 3 NPD35K.
Today share step by step guide to safely Root your Nexus 6P on latest Android N Developer Preview 3 NPD35K Factory Image.
Step 12: Once completed, choose RECOVERY from the Fastboot menu and enter Recovery Mode.
Step 13: In ClockworkMod recovery, scroll down to “flash zip from SD card” and press the power button to select it.
Step 14 : Press the Power button again and select “choose zip from sdcard”.
Step 15 : Now using your volume keys, navigate to BETA-SuperSU-v2.71-20160331103524.zip and select it using the Power button. Confirm the installation on the next screen and the installation procedure should start now.
Step 16 : After the installation completes, go to “+++++Go Back” and reboot the phone by selecting “reboot system now” from the Recovery menu. The phone will boot now and it might take about 5 minutes to boot on your first time. So, please wait.
Meanwhile, you can Root your Nexus 6P on latest Android N Developer Preview 3 NPD35K.
Today share step by step guide to safely Root your Nexus 6P on latest Android N Developer Preview 3 NPD35K Factory Image.
Prerequisites:
- This root method is only for Android N (NPD35K) installed on Nexus 6P and I am not sure if it will work on the other variants of the Nexus 6P on other carriers.
- Your Nexus 6P bootloader should be unlocked. Nexus 6P should be on Android N NPD35K software version.
- Make a Nandroid backup of your previous phone set up before proceeding
Disclaimer: We provide various Firmware Updates and Rooting process along with Custom ROM,Modes,file are all belong to their owners/developers. The author of this site or the developers are not responsible, if you damage or brick your device.Do it on your own risk and follow the instruction properly.
How to Root Huawei Nexus 6P on Android N Developer Preview 3 NPD35K :
Step 1: Download Android SDK from the Android Developers website and install. Also set it up with downloading platform-tools and USB drivers’ package in SDK.
Step 2 : Enable USB Debugging mode in your Nexus 6P.
Step 3: Download Fastboot from the following links depending on your OS and extract it in android-sdk-windowsplatform-tools directory. Create directory if not already there.
Step 2 : Enable USB Debugging mode in your Nexus 6P.
Step 3: Download Fastboot from the following links depending on your OS and extract it in android-sdk-windowsplatform-tools directory. Create directory if not already there.
- Windows: Download here
- Mac: Download here
- Linux: Download here!
[Note: Skip Steps 1, 2, 3 if you already have them.]
Step 4: Download SuperSU v2.71 for Nexus 6P on your PC, if you haven’t already.
Step 5: Connect and mount your Nexus 6P USB memory on your computer using the USB cable.
Step 6: Now copy/paste the BETA-SuperSU-v2.71-20160331103524.zip file to your SD card. Make sure the file is in the SD card / internal storage root (not in any folder).
Step 7: Then turn OFF your phone.
Step 8: twrp-2.8.7.0-angler.img and save it to your android-sdk-windowsplatform-tools directory on your computer.
Step 9: Now go into Fastboot/Bootloader Mode on Nexus 6P.
How? Press Volume Down + Power keys for a few seconds till you see some text on the screen. This is Bootloader Mode.
Step 10: Navigate to android-sdk-windowsplatform-tools directory and open Command Prompt (Shift + Right-click > Open Command Prompt).
Step 11: Type in the following command and press Enter.
Step 10: Navigate to android-sdk-windowsplatform-tools directory and open Command Prompt (Shift + Right-click > Open Command Prompt).
Step 11: Type in the following command and press Enter.
fastboot flash recovery twrp-2.8.7.0-angler.img
Step 12: Once completed, choose RECOVERY from the Fastboot menu and enter Recovery Mode.
Step 13: In ClockworkMod recovery, scroll down to “flash zip from SD card” and press the power button to select it.
Step 14 : Press the Power button again and select “choose zip from sdcard”.
Step 15 : Now using your volume keys, navigate to BETA-SuperSU-v2.71-20160331103524.zip and select it using the Power button. Confirm the installation on the next screen and the installation procedure should start now.
Step 16 : After the installation completes, go to “+++++Go Back” and reboot the phone by selecting “reboot system now” from the Recovery menu. The phone will boot now and it might take about 5 minutes to boot on your first time. So, please wait.
That’s it! Your Nexus 6P is now rooted on Android N Developer Preview 3 firmware on your phone! Check for the SuperSU app in your apps list to verify.
Available link for download
Saturday, 8 October 2016
How to update to Android N Developer Preview 2 manually using OTA downloads
How to update to Android N Developer Preview 2 manually using OTA downloads
Google today announced that Android N Developer Preview 2 is coming OTA to several Nexus devices in the coming days and weeks. If you like to get the latest from Google, you know that “coming weeks” could be a pretty long wait. Thankfully, you can head to the front of the line and install the over-the-air (OTA) update by following our quick guide…
This guide assumes you already have the ADB tools installed on your computer. If you don’t know how to do this or what this is, this guide probably isn’t for you. If you need the ADB tools, head over to Google’s developers site and download the Android SDK. Downloading the SDK and making sure ADB is correctly set up is probably the hardest part, but this guide is for those who have already done this.
Download the OTA
The first step in updating to Android Marshmallow using OTA files is to actually download the proper OTA image file for your device. We’ve compiled a full list of currently-available Android N Developer Preview 2 download links straight from Google’s servers to help you with that.
Prepare your Device
Once you have the OTA zip downloaded to your computer, reboot your device into its bootloader. To do this, power off your device and power it back on while holding the volume down button and the power button down simultaneously. You need to get into the recovery from here. Press the volume button down until you see “Recovery mode” then press the power button. This should present you with the below screen.

Lastly, when you see the green Android icon on the screen, you need to hold and power button down and then press and release release volume up button to reveal the menu. From that menu, select “apply update from ADB” and make sure your device is plugged into your computer if you haven’t already.
Install the OTA
Open up the command line on your computer (terminal for Mac, command prompt for Windows) and change the directory to the location of the OTA file (For example: cd /Users/<yourusername>/Downloads/). Now run the command “adb sideload <name of the OTA file>”. The name of the OTA file is going to be a long string of letters and numbers and will end with “.zip.”Once you see “Install from ADB complete” on your Android device’s screen, simply reboot your device. Once you’ve successfully rebooted, you should have the latest release of Android on your Nexus.
Available link for download
Tuesday, 20 September 2016
Install SuperSU and Root Android N Developer Preview Guide
Install SuperSU and Root Android N Developer Preview Guide
Root is now available for Android N Developer Preview images and can be installed through TWRP or CF Auto Root. If you like testing the latest version of Android earlier than most people, then you might have installed the Android N Developer Preview image on your phone by now.
If you have updated your phone to Android N, you will be happy to hear that Chainfire, the developer who is responsible for some of the most popular root apps on the Play Store, has released SuperSU v2.69 which supports Android N Developer Preview. The easiest way to root Android N is by flashing SuperSU v2.69 through a custom recovery such as TWRP, but if you have no recovery installed, then there is another alternative called CF Auto Root.
If you have updated your phone to Android N, you will be happy to hear that Chainfire, the developer who is responsible for some of the most popular root apps on the Play Store, has released SuperSU v2.69 which supports Android N Developer Preview. The easiest way to root Android N is by flashing SuperSU v2.69 through a custom recovery such as TWRP, but if you have no recovery installed, then there is another alternative called CF Auto Root.
How To Root Android N with SuperSU v2.69 and CF Auto Root
Since TWRP is not yet available on Android N, the developer recommends using CFAR. It is a simple way of rooting your Android N device. You need to install the USB drivers and download the CF Auto Root package.
Download required files
- CF Auto Root for Android N
- Nexus 6P: CF-Auto-Root-angler-angler-nexus6p-v2.70.zip
- Nexus 5X: CF-Auto-Root-bullhead-bullhead-nexus5x-v2.70.zip
- Nexus 6: CF-Auto-Root-shamu-shamu-nexus6-v2.70.zip
- Nexus 9: CF-Auto-Root-flounder-volantis-nexus9-v2.70.zip
How to use CF Auto Root on Android N
Firstly, you need to download the correct CF Auto Root package for your phone. You can download it from the download link below. Once downloaded, extract the package. You will find two folders and three files: “root-windows.bat”, “root-mac.sh” and “root-linux.sh”. Each file is for a different OS, Windows, MAC and Linux.[ads-post]
- Turn your phone off. Go into bootloader or fastboot.
- Connect your phone to your PC using a USB cable.
- Double click on one of the three files, depending on what OS you are.
Follow the instructions if any. Then the phone will reboot and you will have root on your Android N device.
Available link for download
Sunday, 28 August 2016
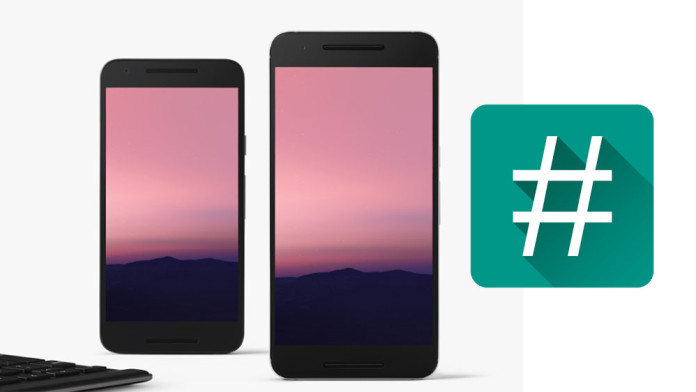
Download Android N Stock Wallpaper High Resolution
Download Android N Stock Wallpaper High Resolution
Today we provide you the Android N stock wallpaper. Google first Android N 7.0 developer preview is out for Nexus devices. Google usually release its new OS for developers at its annual Google I/O developer conference which will be held on May 16, but this time, they surprised everyone with its early release.

If you are not a Nexus owner, you can’t try it. This Android N developer preview is only available for Nexus 6P, Nexus 5X, Nexus 6, Nexus 9, Nexus Player and for Pixel C. If you are an owner of Nexus device, then you can enroll for the Android Beta Program to receive the latest Android N developer previews directly to your phone via OTA. Google comes with some new changes, some improvements on its old features and with a beautiful new wallpaper. You can Download Android N Stock Wallpaper at the bottom of the page.
If you are not a Nexus owner, you can’t try it. This Android N developer preview is only available for Nexus 6P, Nexus 5X, Nexus 6, Nexus 9, Nexus Player and for Pixel C. If you are an owner of Nexus device, then you can enroll for the Android Beta Program to receive the latest Android N developer previews directly to your phone via OTA. Google comes with some new changes, some improvements on its old features and with a beautiful new wallpaper. You can Download Android N Stock Wallpaper at the bottom of the page.
Download Android N Wallpaper: 2331×1920 & 2880×2560
The wallpaper features a picturesque view where dark blue, pink and purple dominate. The wallpaper comes in two sizes: 2331×1920 and 2880×2560, and you can download the one that fits your phone better.
Available link for download
Subscribe to:
Posts (Atom)