Showing posts with label using. Show all posts
Showing posts with label using. Show all posts
Friday, 30 December 2016
Hide The Hard Drives In Windows Using CMD
Hide The Hard Drives In Windows Using CMD
In our computer sometimes we want to hide our personal folder or data from others like guest, friends .But if you can hide a drive that time no one can understand that you have another drive where you share your personal folder or data. And it’s look like a magic for others. I think you already know about this but those who don’t know about this you can do this simply. What if you could hide a complete drive and nobody could see or find it anywhere?
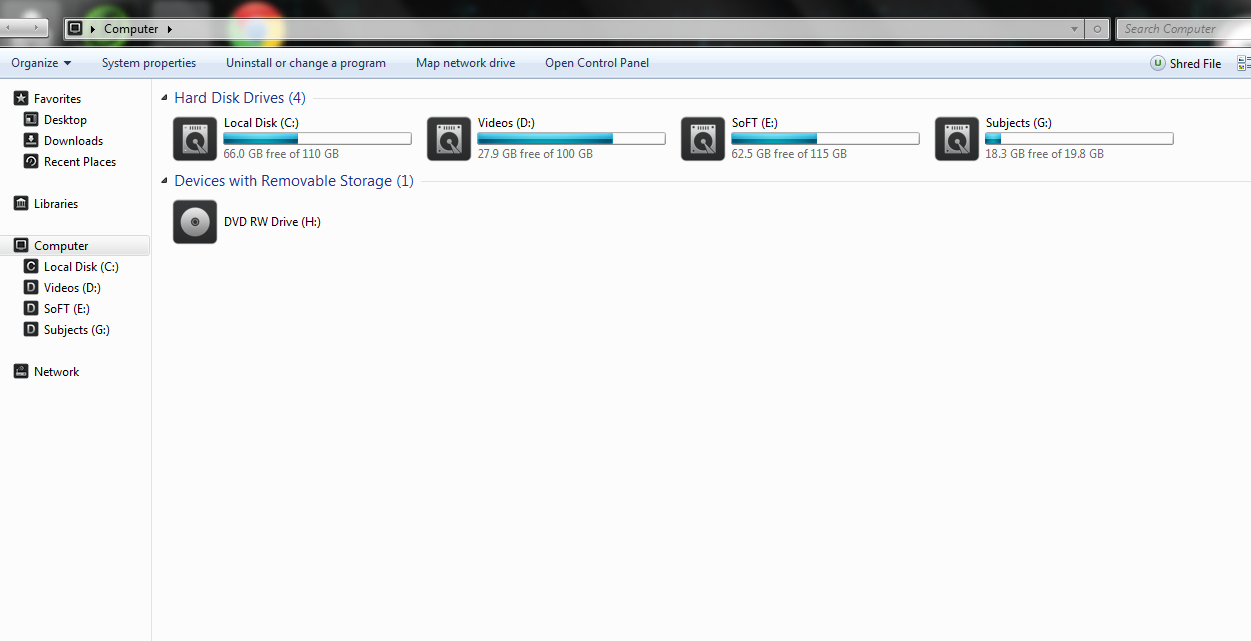
Here I am going to share another interesting use of Command Line. You can use the Command Prompt to hide one or more drives in the explorer. You can use a free tool to do the same but if you want you can easily hide a drive in a few seconds without using a third-party software.
Follow These Steps:
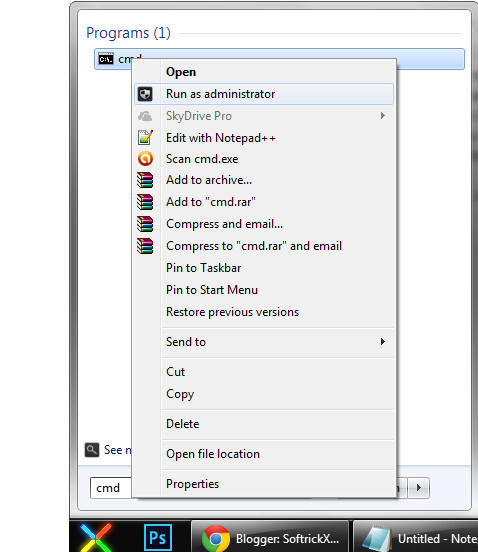
1: Open Command Prompt as Administrator.First Press Start+R, one dialogue box will come write here CMD.
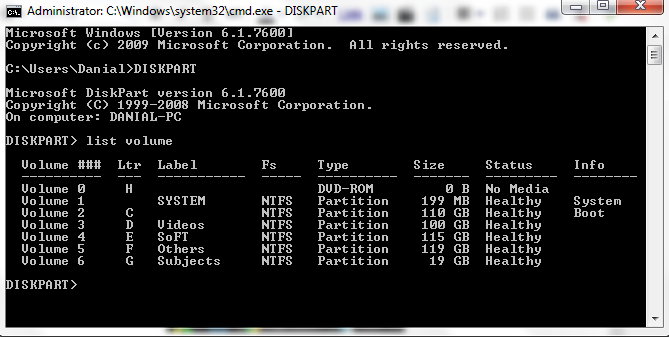
2.Command prompt will start and write here DISKPART [It is not mandatory to use capital or small letter] Then press Enter
3.Disk part will work as DISKPART> write here list volume and press Enter.
4:After pressing Enter you can see a list of your disk drive and choice, which drive you want to hide.
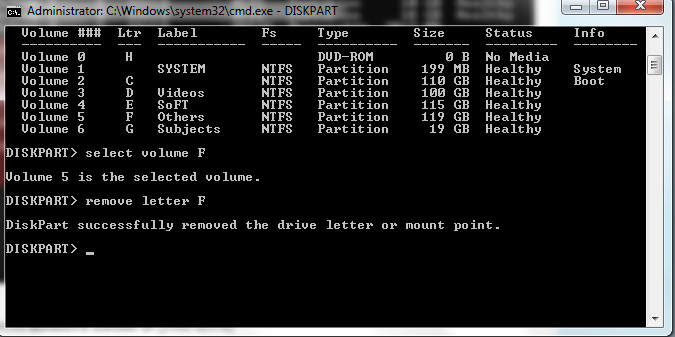
5: Now choose the volume you want to hide. Then type “select volume F” and hit Enter.Then you can see volume 5 [your number will be here] is selected.
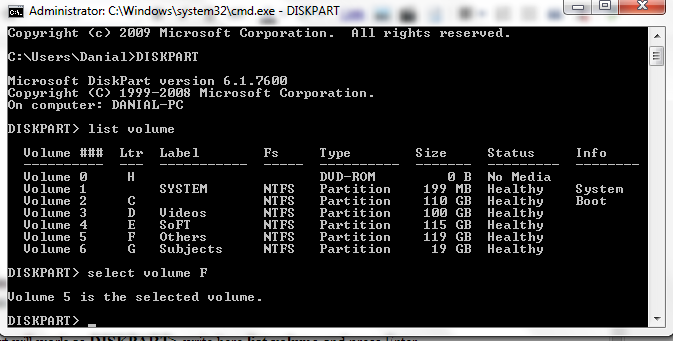
6: Then write remove letter F [your drive]
A confirmation message will come like : Disk part successfully remove the drive letter or mount point And go to My computer and see. Your drive is disappear.
See your drives..
Done !!
How To Get Back The Hidden Drive Using CMD
Dont afraid about this you can back it again simply following this way..
1: Follow step 1-4 again.
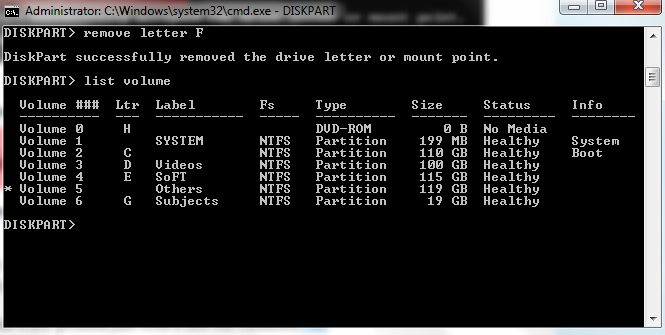
2: Now instead of typing “remove letter F”, you need to type “assign letter F” and hit the Enter key. Change F with the letter you want to assign to this drive. For security and integrity, type the same letter which was assigned to this drive earlier.
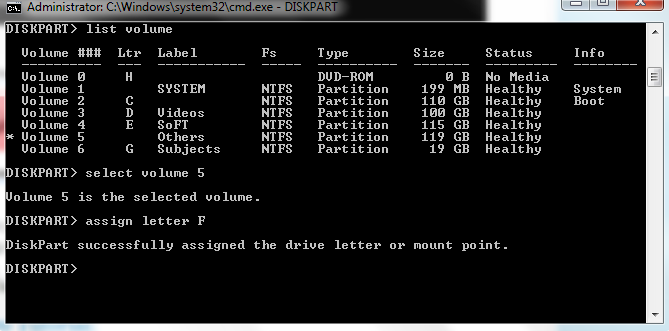
DOne :)
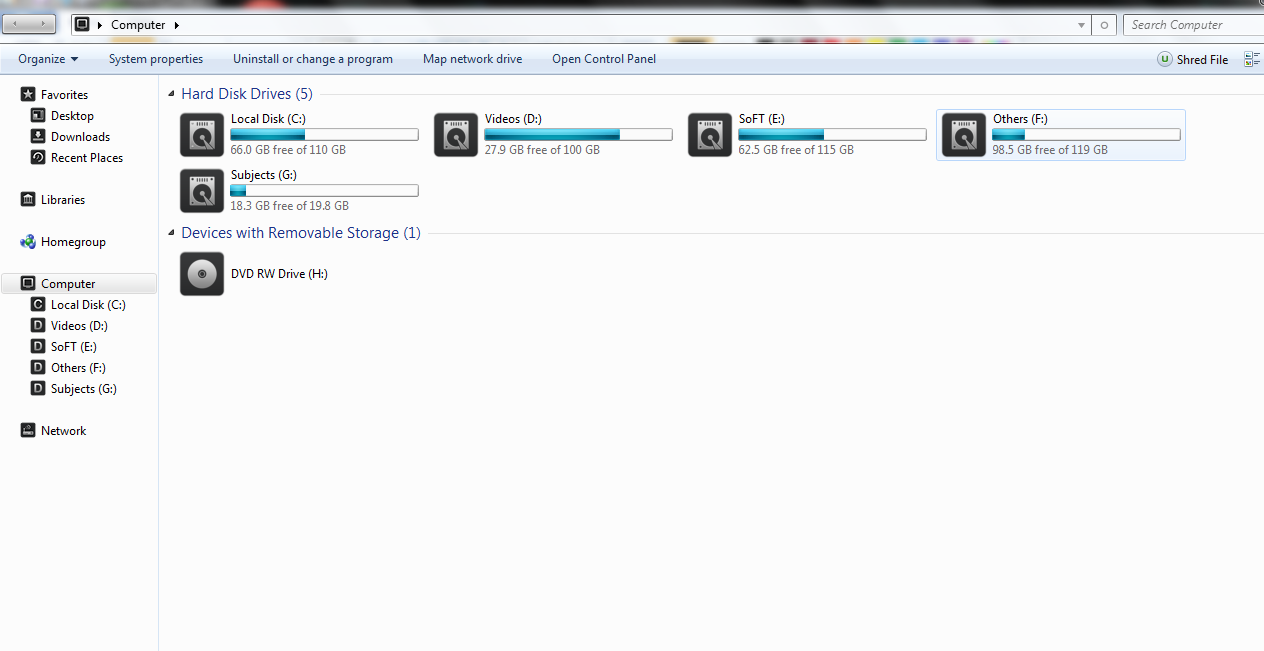
See Your Drives...
thank u for read it ...
Available link for download

Thursday, 29 December 2016
How To Take Screenshot on Moto G4 Plus Without Using Apps
How To Take Screenshot on Moto G4 Plus Without Using Apps
Generally, what we do is we take a screenshot or snapshot and share using WhatsApp, Hike, Telegram, etc. So, taking a screenshot on Moto G4 Plus is much easier using a special key combination. To take a snapshot on Moto G4 Plus, you don’t need to have an extra app which eats up your device valuable storage.
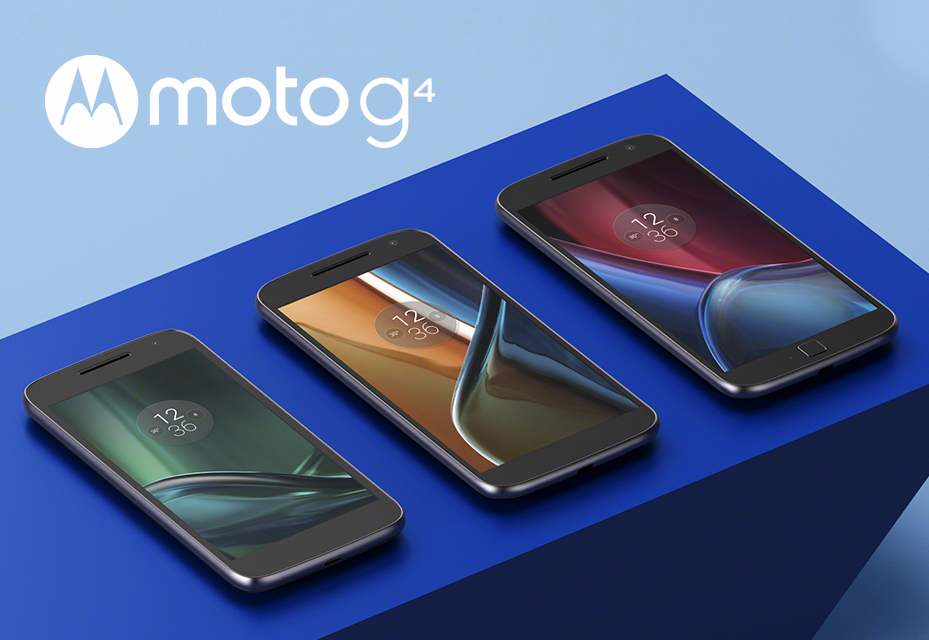
you can take screenshot at any time such as in between playing games, watching videos, listening music or while loading web pages. It’s much easier to take a snapshot on Moto G4 Plus without closing any of the running apps. In fact, there are many apps available in the market which can easily take a screenshot on Moto G4 Plus, but the problem is they requires root access and this is the reason, to avoid the apps. So, in this article we will be helping to take a snapshot on Moto G4 Plus without any hassle.
you can take screenshot at any time such as in between playing games, watching videos, listening music or while loading web pages. It’s much easier to take a snapshot on Moto G4 Plus without closing any of the running apps. In fact, there are many apps available in the market which can easily take a screenshot on Moto G4 Plus, but the problem is they requires root access and this is the reason, to avoid the apps. So, in this article we will be helping to take a snapshot on Moto G4 Plus without any hassle.
How To Take Screenshot on Moto G4 Plus Without Using Apps
- Get your screen ready of which you want to take a screenshot / snapshot of!
- Now, simultaneously hold Power Button and Volume Down button for 2 – 3 seconds.
- Immediately, you will have a preview of a screenshot and a new notification will be seen in your status bar.
- In the notification, it will say that the “Screenshot Captured”.
So, this is how you can take screenshot on Moto G4 Plus without using apps. In order to view the captured screenshot, pull down from the status bar and tap on notification. If you have cleared the notification, then go to Gallery and see the Screenshots folder to find all your captured screenshots in your device.
Available link for download
Friday, 23 December 2016
How to backup roms of MTK devices using MTK Driod tools
How to backup roms of MTK devices using MTK Driod tools
Note
Device must be rooted & CWM recovery installed.
Make sure there is about 2GB of memory in your device SD card.
No file is lost or changed after this procedure.
Download MTK Droid Tools from here
Download android adb drivers from here or here
Learn how to root your device from here.
Learn to install CWM from here
Launch MTK droid tools.
Boot device into CWM recovery by holding volume up and power button for about 3secs.
Connect device to PC and wait for MTK droid tools to detect it.
The small square in cyan color shows phone is booted in CWM recovery.
Click on backup, root, recovery tab.
Click Backup button and wait for the ROM ro back up. This will take about 15mins.
When Back up is complete, navigate to backups inside MTK droid tools folder.
You will see a folder with name of the device you just backed up.
Open MTK droid tools in the backup, root, recovery tab and click prepare blocks for flash tool
Navigate to backups inside MTK droid tools folder.
Open the folder having the name of your device.
Select files.md5 and wait for the process to complete. This might take 2 - 5 mins.
When it is completed. navigate to the folder having the name of the device.
The ROM back up is found inside the !Files_to_FlashTool folder.
Learn how to flash the backup ROM to a device from here
Available link for download
Friday, 16 December 2016
HOW TO FLASH SONY XPERIA USING FLASH TOOL Tutorial
HOW TO FLASH SONY XPERIA USING FLASH TOOL Tutorial
HOW TO FLASH SONY XPERIA USING FLASH TOOL
Download
Flashtool 0.9.19.10 windows exe Full edition
raders and Make Money (One Click) : http://ow.ly/KNICZ
Install Flashtool Please see picture below


This is optional if you want to create a shortcut to the desktop

Flashing
1) Install drivers for your Xperia handset
2) Download ftf firmware
3) Place firmware in correct location on your PC
Place the FTF file in the C:UsersM.flashToolfirmwares folder
4) Launch Flashtool
Open the Flashtool application on your PC.

Click on the lightning bolt symbol. Select Flashmode and click OK.

Select the firmware that you have downloaded in the left column. If you do not want to do a clean install ensure ‘Data’ is not ticked. Press the ‘Flash’ button.

6) Connect your Xperia to the PC
Once you press the Flash button, you will see that Flashtool is ‘Preparing files for flashing’.

When you see the prompt below you need to connect your Xperia handset to the PC. Turn your phone off. Press and hold the volume down button while plugging the USB cable into your Xperia.

7) Flashing process will start
The flashing process should now start.

Once you see the “Flashing finished” message in Flashtool, remove your handset from the PC and restart it (this may take a few minutes so don’t panic).

8 ) Your Xperia S should now be updated
Congratulations, your Sony Xperia S should now update firmware!
Available link for download
Tuesday, 8 November 2016
Easily Share Files from any Devices using Cloudup
Easily Share Files from any Devices using Cloudup
Cloudup is a simple and easy-to-use service that lets you to instantly share or stream your videos, photos, music, documents and files to anyone.
Using this service, there is no need to wait for upload or downloads, as the service supports instant stream features and best of all is just by dragging and dropping files it instantly shares.
Easily Share Files from any Devices
You can create stream and securely shares it with the recipient or share stream link via twitter, Facebook or email. Cloudup free account lets users to share up to 1000 items or or up to 10 files a day with 25MB file size and total files up-to 200GB of data, Upgrade options are coming soon.

Currently Cloudup has Mac and Windows app that’s compatible with OS X version 10.6 (Snow Leopard) or higher, Windows XP, Vista, Win 7 and 8.
Also Read- How to share files between multiple devices using Wi-Fi
The uses of cloudup is so simple, just drag and drop your files to either cloudup online dashboard or its windows/mac clients and your sharing links will be available immediately.
Available link for download
Sunday, 16 October 2016
How to Install Oxygen OS 3 0 2 Marshmallow Update on OnePlus 2 Using Stock Recovery
How to Install Oxygen OS 3 0 2 Marshmallow Update on OnePlus 2 Using Stock Recovery
OnePlus Community is now rolling out the official Oxygen OS 3.0.2 build for the public. The manufacturer promised another update to the OnePlus 2 device for its community build Oxygen OS 3.0.1 that was released a couple of weeks ago.

This new update brings many new features, software tweaks, stability improvements and of course, the latest Android 6.0.1 Marshmallow firmware upgrade. Improvements to the camera, audio, user interface and some system-wide stability have been brought with this update. OnePlus development team has also promised that the OTA will be available and start hitting the devices all across the globe in the next 48 hours.
This new update brings many new features, software tweaks, stability improvements and of course, the latest Android 6.0.1 Marshmallow firmware upgrade. Improvements to the camera, audio, user interface and some system-wide stability have been brought with this update. OnePlus development team has also promised that the OTA will be available and start hitting the devices all across the globe in the next 48 hours.
Download Official Oxygen OS 3.0.2 For OnePlus 3
- OnePlus 2 Oxygen 3.0.2 OTA ? Direct Download | Mirror1 | Mirror2
- OnePlus 2 Oxygen 3.0.2 Full Firmware zip Files ? Download
How to Install Oxygen OS 3.0.2 on Oneplus 2 Device and Update to Android 6.0.1 Marshmallow
Step 1. Before you proceed, make sure you have installed the base update prior to v 3.0. That means make sure you have Oxygen OS v2.2.0 or higher as you current firmware version.
Step 2. Now download the Oxygen OS 3.0 update zip file from the downloads and transfer it to your phone’s internal storage.
Step 3. Now boot your OnePlus 2 into Recovery Mode. To do so, turn off your device completely and then press and hold the power button and volume down key for a few seconds. Select Recovery if an option is available to get into stock recovery mode.
Step 4. Once into the Stock Recovery Mode, Select Apply Updates from phone’s storage and then navigate to the OTA zip file and select it.
Step 5. Confirm the operation and the installation process will begin updating your OnePlus 2. This may take a few minutes.
Step 6. When the installation completes, it will automatically reboot. If not, go back and reboot manually.
Step 2. Now download the Oxygen OS 3.0 update zip file from the downloads and transfer it to your phone’s internal storage.
Step 3. Now boot your OnePlus 2 into Recovery Mode. To do so, turn off your device completely and then press and hold the power button and volume down key for a few seconds. Select Recovery if an option is available to get into stock recovery mode.
Step 4. Once into the Stock Recovery Mode, Select Apply Updates from phone’s storage and then navigate to the OTA zip file and select it.
Step 5. Confirm the operation and the installation process will begin updating your OnePlus 2. This may take a few minutes.
Step 6. When the installation completes, it will automatically reboot. If not, go back and reboot manually.
Available link for download
Saturday, 8 October 2016
How to flash zip files using CWM TWRP recovery
How to flash zip files using CWM TWRP recovery
If you want to improve your android device performance or to try out different Custom roms or mods on your device it is required to flash them via a recovery like CWM, TWRP etc… For the android users who are quite familiar with the recoveries, it is easy to flash various zip files via recovery.

You can make your device special by installing device specific mods or tweaks and you can show off to your friends. Many devices have some unique wonderful mods that are not available to other smartphones, so all you need to do is to dig a little deeper in the development forums like XDA developers. Once you check these forums about these tweaks and updates, you’ll find packages in Zip formats and see words like Flash it via recovery and you might wonder what it is if you’re new to all this. So here we are today to show you how to flash these Zip packages using various custom recoveries.
So follow the instructions carefully on how to install a flashable zip package using CWM/TWRP recovery. For the case of simplicity, lets take the zip you want to flash by the name Sample.zip through out the post.
You can make your device special by installing device specific mods or tweaks and you can show off to your friends. Many devices have some unique wonderful mods that are not available to other smartphones, so all you need to do is to dig a little deeper in the development forums like XDA developers. Once you check these forums about these tweaks and updates, you’ll find packages in Zip formats and see words like Flash it via recovery and you might wonder what it is if you’re new to all this. So here we are today to show you how to flash these Zip packages using various custom recoveries.
So follow the instructions carefully on how to install a flashable zip package using CWM/TWRP recovery. For the case of simplicity, lets take the zip you want to flash by the name Sample.zip through out the post.
How to Flash Zip File Using CWM/TWRP Recovery
Be sure to transfer the Sample.zip to your phone and remember the location of the file.
You will need to flash them now on your device using either of ClockworkMod (CWM) or TWRP recovery.
Guide for CWM Recovery Users
- Boot into recovery mode. If you’re rooted, the easiest way to boot into recovery mode would be using the QuickBoot app. If not rooted, then search for the hardware keys combo for entering to the recovery on your device.
- Create a Nandroid Backup from recovery. It’s optional but very important to do, so that in case something goes wrong you can restore to current status easily. For making a Nandroid Backup, go to Backup And Restore » Backup.
- Install the Zip file:
- Select Install zip » Choose zip from sdcard (or external sdcard, you know where your files are) » browse to the location where you saved the file and select the Sample.zip file.
- Reboot your device. Go back to the main menu of recovery and tap on Reboot » then, tap on System to reboot your phone.
Guide for TWRP Recovery Users
- Boot into recovery mode. If you’re rooted, the easiest way to boot into recovery mode would be using the QuickBoot app. If not rooted, then search for the hardware keys combo for entering to the recovery on your device.
- Create a Nandroid Backup from recovery. It’s optional but very important to do, so that in case something goes wrong you can restore to current status easily. For making a Nandroid Backup, go to Backup » and select all check boxes and swipe on the Swipe to confirm option at the bottom of the screen to confirm backup.
- Install the Zip file:
- Tap on Install » browse to the location where you saved the file and select the Sample.zip file. Now at the bottom of the screen, do a swipe on the Swipe to confirm flash option to begin flashing.
- Reboot your device. Go back to the main menu of recovery and tap on Reboot » then, tap on System to reboot your phone.
Available link for download
How to update to Android N Developer Preview 2 manually using OTA downloads
How to update to Android N Developer Preview 2 manually using OTA downloads
Google today announced that Android N Developer Preview 2 is coming OTA to several Nexus devices in the coming days and weeks. If you like to get the latest from Google, you know that “coming weeks” could be a pretty long wait. Thankfully, you can head to the front of the line and install the over-the-air (OTA) update by following our quick guide…

This guide assumes you already have the ADB tools installed on your computer. If you don’t know how to do this or what this is, this guide probably isn’t for you. If you need the ADB tools, head over to Google’s developers site and download the Android SDK. Downloading the SDK and making sure ADB is correctly set up is probably the hardest part, but this guide is for those who have already done this.
Download the OTA
The first step in updating to Android Marshmallow using OTA files is to actually download the proper OTA image file for your device. We’ve compiled a full list of currently-available Android N Developer Preview 2 download links straight from Google’s servers to help you with that.
Prepare your Device
Once you have the OTA zip downloaded to your computer, reboot your device into its bootloader. To do this, power off your device and power it back on while holding the volume down button and the power button down simultaneously. You need to get into the recovery from here. Press the volume button down until you see “Recovery mode” then press the power button. This should present you with the below screen.

Lastly, when you see the green Android icon on the screen, you need to hold and power button down and then press and release release volume up button to reveal the menu. From that menu, select “apply update from ADB” and make sure your device is plugged into your computer if you haven’t already.
Install the OTA
Open up the command line on your computer (terminal for Mac, command prompt for Windows) and change the directory to the location of the OTA file (For example: cd /Users/<yourusername>/Downloads/). Now run the command “adb sideload <name of the OTA file>”. The name of the OTA file is going to be a long string of letters and numbers and will end with “.zip.”Once you see “Install from ADB complete” on your Android device’s screen, simply reboot your device. Once you’ve successfully rebooted, you should have the latest release of Android on your Nexus.
Available link for download
Tuesday, 6 September 2016
How To UnBrick Lenovo A526 Using SP Flash Tool With Tested Firmware
How To UnBrick Lenovo A526 Using SP Flash Tool With Tested Firmware
How To UnBrick Lenovo A526 Using SP Flash Tool With Tested Firmware
These tutorial will guide you the steps that you should follow to unbrick your Lenovo A526 and I will share here also the Firmware that I use to unbrick this Lenovo A526.
These also works for this following problem you may encounter in your Lenovo A526.
These also works for this following problem you may encounter in your Lenovo A526.
1.Hang in logo
2.Rebooting
Downloads:
Lenovo A526 Firmware/Stock ROM

VCom Drivers
Drivers Auto Installer
Sp Flash Tools
Sp Flash Tools
After finish downloading all files put in one folder in desktop to easily navigate the files.
If you using Window 7 OS
Connect your phone in PC using Micro USB Cable in turn-off mode and open Drivers Auto Installer and run the install-window batch file.Like shown in the image.


3. If the driver is successfully installed MediaTek DA USB VCOM will appear in the New Hardware Wizard.

2.Now,Click Scatter-loading

3.Now,A window will pop-out and Browser for MT6582_Android_scatter_emmc_DH.(Follow on the image)

4.Now,Check all Box and manually load all files and after finish loading all files,click on now Download.(Number 2 in the image)

5.Now,Connect your phone to PC using USB Cable while pressing Volume Down.When successfully connected progress bar will run and change to different colors.Wait until flashing complete and a dialog window will pop-out saying download OK.

Some workarounds:
If you encounter PMT_Changed error here is what you do:
In Older Version of FlashTool
Load the scatter file
Click in Format (a new menu will popup)
Make sure that you select Format whole flash except bootloader then press OK
Connect your phone in bootmode (Turn off your device then hold Volume UP or VOLUME DOWN then insert USB)
It should detect your phone and continue to flash.
Then Click Download to fully flash your phone.
Hard Reset your phone after flashing.
In Latest version of Flashtool
Load the scatter file
Choose Format + Download (Underneath Scatter-loading file)
Then Click Download and wait until it is done flashing
For Invalid IMEI:
Your Phone/Tablet must be rooted first
Restore yong IMEI in MTKDroidTools version 2.5.3. You will have this error when you format your phone in Flashtool as I had experienced. To restore download MTKDroidTools version 2.5.3 After you extract the file. Open the green robot, you must enable the usb debugging in your phone. It is usually located in Settings>Devoloper Mode then look for usb debugging. After enabling it. Connect your phone in your computer then in MTKDroidTool click on ROOT. Wait for it to finish, then Click in IMEI/NVRAM, input 15 number in each box. Then click REPLACE. Then click Reboot or you can manually turn off your phone. Then turn your phone on again. You can see that you have fully restored your IMEI.
Thats It Very Easy!
Something Wrong in my Post?Feel Free to comment Below!
Dont Forget to Like us on Facebook or Subscribe to us via E-mail
2.Rebooting
|
| After Finish flashing |
Downloads:
Lenovo A526 Firmware/Stock ROM
VCom Drivers
Drivers Auto Installer
Sp Flash Tools
Sp Flash Tools
After finish downloading all files put in one folder in desktop to easily navigate the files.
Installing Drivers (Skip this Step if you have already installed the drivers of your phone)
First thing first,Before you can flash/install rom in your phone you must secure first that your phone is detected in your PC.If you using Window 7 OS
Connect your phone in PC using Micro USB Cable in turn-off mode and open Drivers Auto Installer and run the install-window batch file.Like shown in the image.
The drivers will automatically installed in your PC.
If You using Window XP
Connect your phone in PC using Micro USB Cable in turn-off mode while pressing Volume Up or Volume Down.This will detect and look for the driver.
1. This is the first time that you will connect your phone and it will search for the correct driver.
2. Check include this location ... ... and click on browse. Look for USB VCOM Driver and Click on 2K_XP_COM folder if you are using Windows XP or Win7 for Windows 7 and then press OK when you are done picking the right folder for the driver.
Flashing/Install new Firmware/Stock ROM
1.Open Sp Flash tool2.Now,Click Scatter-loading
3.Now,A window will pop-out and Browser for MT6582_Android_scatter_emmc_DH.(Follow on the image)
4.Now,Check all Box and manually load all files and after finish loading all files,click on now Download.(Number 2 in the image)
5.Now,Connect your phone to PC using USB Cable while pressing Volume Down.When successfully connected progress bar will run and change to different colors.Wait until flashing complete and a dialog window will pop-out saying download OK.
Some workarounds:
If you encounter PMT_Changed error here is what you do:
In Older Version of FlashTool
Load the scatter file
Click in Format (a new menu will popup)
Make sure that you select Format whole flash except bootloader then press OK
Connect your phone in bootmode (Turn off your device then hold Volume UP or VOLUME DOWN then insert USB)
It should detect your phone and continue to flash.
Then Click Download to fully flash your phone.
Hard Reset your phone after flashing.
In Latest version of Flashtool
Load the scatter file
Choose Format + Download (Underneath Scatter-loading file)
Then Click Download and wait until it is done flashing
For Invalid IMEI:
Your Phone/Tablet must be rooted first
Restore yong IMEI in MTKDroidTools version 2.5.3. You will have this error when you format your phone in Flashtool as I had experienced. To restore download MTKDroidTools version 2.5.3 After you extract the file. Open the green robot, you must enable the usb debugging in your phone. It is usually located in Settings>Devoloper Mode then look for usb debugging. After enabling it. Connect your phone in your computer then in MTKDroidTool click on ROOT. Wait for it to finish, then Click in IMEI/NVRAM, input 15 number in each box. Then click REPLACE. Then click Reboot or you can manually turn off your phone. Then turn your phone on again. You can see that you have fully restored your IMEI.
Thats It Very Easy!
Something Wrong in my Post?Feel Free to comment Below!
Dont Forget to Like us on Facebook or Subscribe to us via E-mail
Available link for download
Thursday, 25 August 2016
Motorola Using RSD Lite V6 2 4 Install Stock Firmware
Motorola Using RSD Lite V6 2 4 Install Stock Firmware
Motorola Using RSD Lite V6.2.4 Install Stock Firmware
1. Download the stock firmware file for your Motorola Mobile
2. Download RSD Lite tool and install it on your computer: RSDLite v6.2.4
3. Download and setup Android SDK on your computer.
4. Install Motorola USB Drivers if you have not installed it yet.
5. Enable USB Debugging on your Moto Maxx.
6. Now reboot your Moto Maxx into the Fastboot/Bootloader mode. To do so, launch a command window
on your PC, connect your phone to computer via USB cable and type the following line in the command
window:
adb reboot bootloader7. Launch RSDLite and connect your device to computer using USB cable.
8. Now click the 3-dot (…) button on the Filename field, browse to the firmware file with .zip extension and
select it.
9. Finally, click the Start button to initiate firmware installation.
10.Wait patiently while the firmware is being installed. It might take a few minutes.
11.When the installation is finished, reboot your phone
Available link for download
Tuesday, 16 August 2016
Meizu MX5 Flyme 5 1 7 0A Cant send SMS without using systems own default app
Meizu MX5 Flyme 5 1 7 0A Cant send SMS without using systems own default app
Hi guys,
I had recently updated my firmware version on my Meizu MX5, and since then I havent been able to send SMS messages with any SMS messaging app but systems own. I used to send and receive SMS using Contacts+ app, but now my messages are not sent anymore (even though its set as default sms app).
I tried replacing my default sms app to systems default, and then back to Contacts+ but it didnt fix anything. I also tried to empty my messages log - but nothing has changed since.
Did someone experienced such bug and knows how to fix it?
I had recently updated my firmware version on my Meizu MX5, and since then I havent been able to send SMS messages with any SMS messaging app but systems own. I used to send and receive SMS using Contacts+ app, but now my messages are not sent anymore (even though its set as default sms app).
I tried replacing my default sms app to systems default, and then back to Contacts+ but it didnt fix anything. I also tried to empty my messages log - but nothing has changed since.
Did someone experienced such bug and knows how to fix it?
from xda-developers http://ift.tt/2a1gEOP
via IFTTT
Available link for download
Subscribe to:
Posts (Atom)